

Guest Blog: What To Do With My Rainbow Skein?
Some of my friends can do really cool things with yarn and I’m proudly presenting a Guest Blog written by my dear friend Psychiaknits. Enjoy!
Introduction
Hi there, my name is Psychiaknits - a passionate knitter and a mental health expert. I mainly use Instagram to showcase my work. Follow me if you enjoy what you read here.
I was recently gifted a rainbow skein from my friend from Auridon Yarns. I’ve been exploring what I could make with it, and I wanted to share some ideas with you.
This is my first time working with assigned pooling yarn. Numerous patterns for this type of yarn can be found on Ravelry: https://www.ravelry.com/patterns/search#query=assigned%20pooling
There are a few things you need to keep in mind for this yarn. The first is that the rainbow repeats come quite often - about ⅓ of the skein is rainbow and ⅔ beige. Second, it’s a directional yarn, which means the pattern only comes out correctly if used from red to purple.
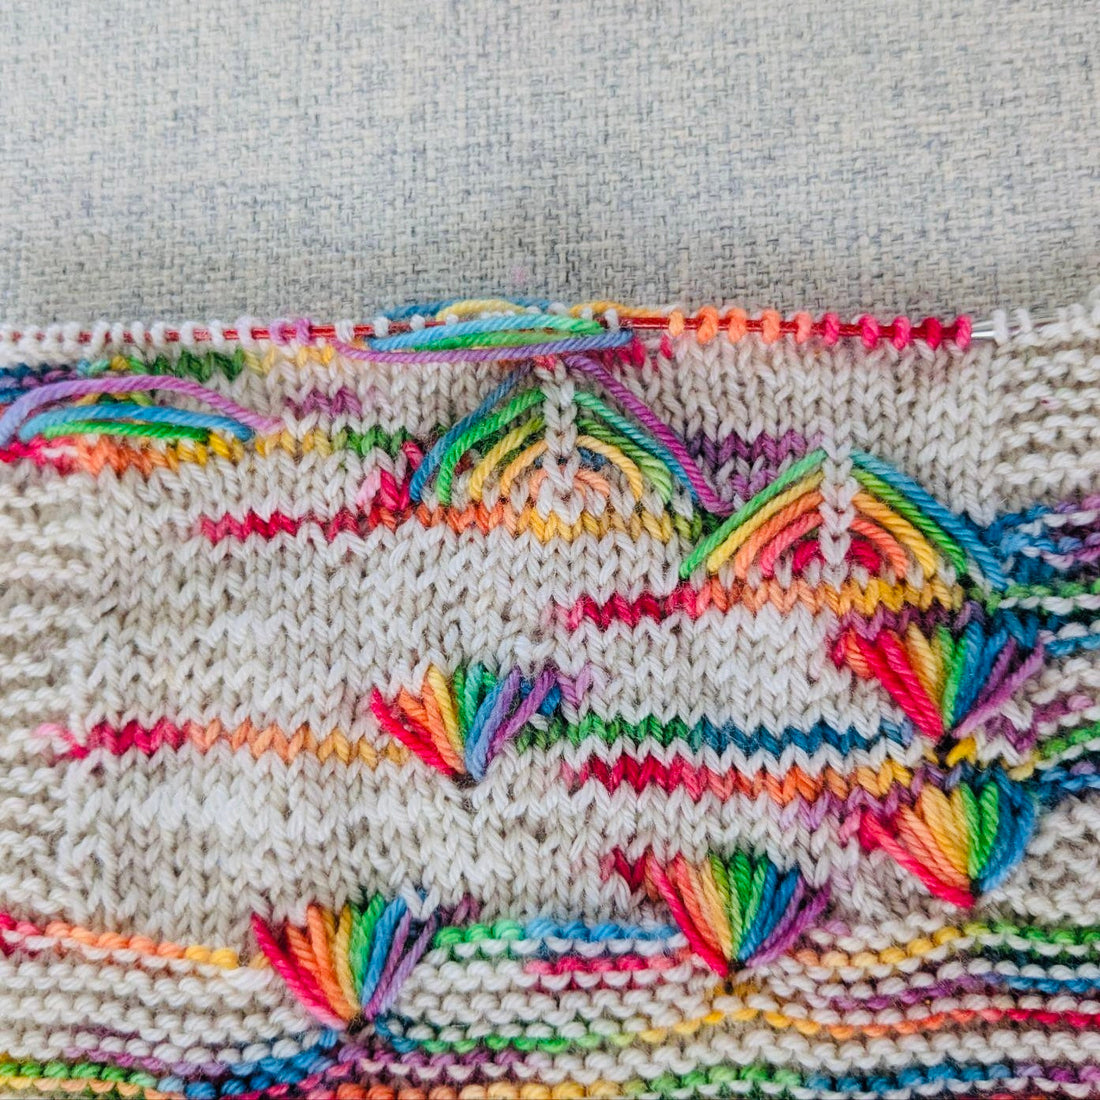
Assigned pooling - a swatch
Assigned pooling is a special dyeing technique where sections of the yarn are dyed in contrasting colors. When knitting, you switch stitches as soon as you reach those sections. This automatically creates a pattern or texture in your work.
I decided to start with some swatching using 3.25mm needles. Here, I used the purl stitch whenever I had a colored stitch on my left-hand needle, and stockinette (knit on the right side, purl on the wrong side) for the rest (with a garter stitch border). This emphasizes the colored stitches.

Next, I tried some rows in garter stitch:

I would say the main benefit of this stitch is that you don’t have to look at your work while knitting. Perfect for a relaxed tv knitting.
Then, I wanted to try a more interesting stitch. I used a double yarn over whenever I encountered a rainbow section:

I didn't really like this as the double yarn overs changed the gauge completely and made the fabric less sturdy.
So I decided to rip back and try some ‘yarn eating stitches’, i.e. stitches that use up a lot of yarn so the rainbow would be in one place.

This is the flower stitch with six petals. When the rainbow starts, insert your needle three stitches to the left and three stitches down. Pull a loop through and up onto your right needle, giving it some slack. Then repeat the following five times: Knit one stitch, pull another loop through the same hole. You have now increased a total of six stitches.
On the return row, k2tog six times to return to the original stitch count.
Lastly, I wanted to try to make an actual rainbow. I think it turned out pretty nice. Some of you will be able to tell what I did from looking at the picture, but I won't tell you the details just yet, as I’m planning to make a pattern for a baby sweater from this yarn:

Planned pooling - in the round
This skein was made for assigned pooling, which means that you just knit happily until you run into another color and then you have to do a certain stitch. I was curious if it was also possible to do planned pooling with this skein. I found out it was possible but it has its limitations.
It had to be done in the round, otherwise, on your knit rows you will get normal rainbows (from purple to red), and on your purl row, you will get reverse rainbows (red to purple).
Using needle size US3 (3.25mm), I cast on 100 stitches (33 stitches for the rainbow and 67 stitches beige). I had a gauge of 21 st/10cm.
This resulted in a knitted circle with a circumference of 48cm.

If you want your colors to align, you will need to aim for a tube with a circumference of 48cm or a multiple of that.
In the future, I will probably use k1p1 ribbing to make a stretchy cowl with this technique.
Conclusion
I loved experimenting with this yarn. There a lots of creative possibilities. I will now continue with my baby sweater - if you would like to follow the progress, follow me on Instagram. [link to profile]